Website Tutorials
How to Use Git to Push to a Different Remote Branch

The usual understanding of a git workflow is when you pull from a remote branch, make changes on your local machine, and then push the changes back to the branch on the remote repo. However, there are many instances where, instead of pushing the same branch, you choose another remote branch to which to push. This can either be an existing branch, or it could be one that doesn’t exist. In this tutorial, I’ll show you how to use git to push to a different remote branch. The process itself is quite simple, and I’ll walk you through using GitHub as an example.
I’ve written an earlier tutorial on how to connect your VPS to GitHub if you want to get started from scratch.
We’ll also look at why you might want to push to a different branch, and how it integrates with various development practices.
Pushing to a Different Remote Branch with Git
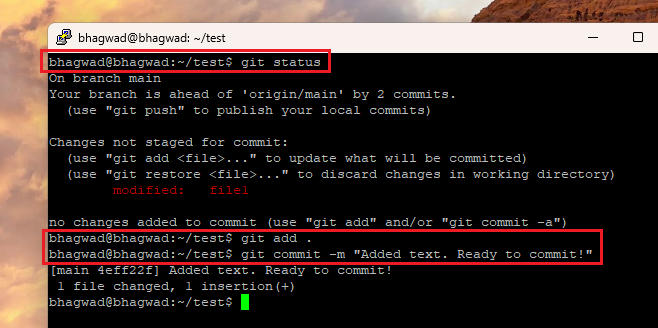
The first step is to ensure that you’ve added and committed the changes you’ve made to your local branch. You can start by checking the status of your git project:
git statusThen add your changes with:
git add .And finally, commit your changes with a message like this:
git commit -m "Added text. Ready to commit!"Here’s a screenshot of adding and committing the changes:
From the above, we get the following information:
- The current branch is “main”
- The remote repo is already set and is called “origin”
Now let’s say that instead of choosing to push our changes to the “main” branch on the remote repo, we want to push to a new branch called “alternate-feature”. This branch may or may not exist on the remote repo. To do this, we type the following command:
git push origin main:alternate-featureThe above command is self-explanatory. We’re using git to push our current working directory on the “main” branch to a new one called “alternate-feature”. Here’s the output:

You can see that the branch didn’t exist before and that we created it through the push request. And you’re done! That’s how you use git to push to a different remote branch. Just to make sure that it’s worked, here’s a screenshot of the GitHub repository on the website showing the existence of the new branch:

So it works as expected!
Ensuring that You have the Requisite Permissions
It’s important to have the necessary permissions to push to the remote repository. The permissions structure will depend on the specific platform you’re using. For this example, I’m using GitHub, so I’ll quickly show you how to input your login credentials while pushing to a remote GitHub repository.
Instead of a traditional username and password, GitHub now uses a “Personal Access Token” or PAT for authentication. This system enables repo administrators to create fine-grained permission mechanisms and lets them have more control over which PATs can be used to access repos. They can remove access whenever they want by managing the PATs on the backend.
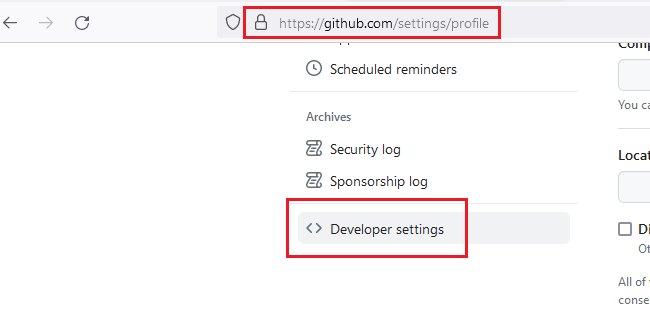
If you’re a GitHub owner, you can generate a new PAT by clicking on the “Settings” menu and then going to “Developer Settings” as shown here:
From Developer Settings, click “Personal access tokens”. Right now, I’m still using Tokens (classic) as shown here:
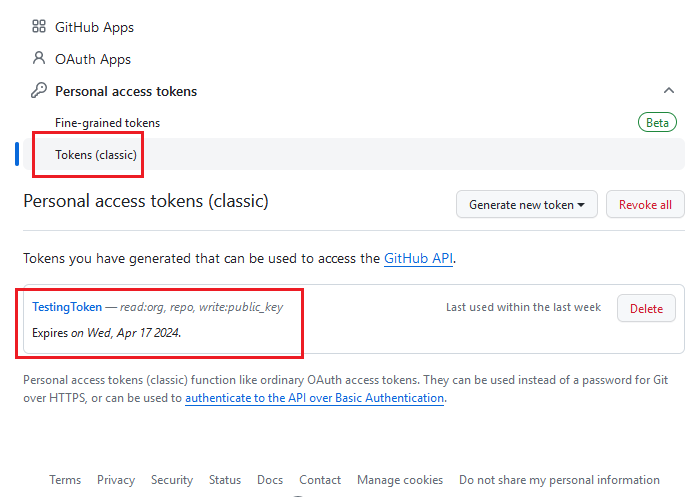
You can use this screen to generate and manage existing tokens. As you can see, you can also delete them from here. Note that when you create a new token, you’ll only be shown the new token once. If you lose it, there’s no going back and you have to create a new one all over again!
Once you have the token, you can authenticate yourself on GitHub by typing your GitHub username and using the PAT as the password.
Use-Cases for Git Pushing to a Different Branch
At first glance, it might seem odd to push your work to a different branch using git, but this is a very common practice. Once you see the benefits, you’ll find yourself using it all the time. Here are a few common reasons why you’ll want to not push to the original branch on git.
Creating a New Line of Development
Often you’ll be working on a new feature or something that isn’t ready for prime-time, and in such situations, it makes sense to push to a different remote branch so that your work stays away from the main line of development. You can invite others to collaborate on the new branch without impacting the application as a whole.
Allowing Pull Requests to Function Smoothly
A pull request allows you to invite developers and colleagues to collaborate on the work that you’ve just pushed to a new remote branch. The way to create a pull request depends on the version control manager. For example, you can create a pull request on GitHub once you’ve finished working on the feature for which you created a new remote branch.
Emergency Hotfixes
When you need to quickly fix a problem in your code, you can work locally on the problem on a branch called “hotfix” for example, then push your code to a different remote branch, which might be called “production”. Remember that just because you’re pushing to a new remote branch, doesn’t mean that it can’t exist beforehand.
Helping Colleagues with Their Code
If you want to contribute some work to the branch on which your colleague is developing, you can use the git feature to push to their remote branch, even though you were working on a different branch locally.
Don’t Use Force Pushes on Shared Remote Branches
A handy git tool is force pushing, where you can override the history of the branch to which you push and replace it with your local history, instead. This is useful for several reasons. Often, while working on a project, you’ll commit unnecessary with lots of commit messages that can be overwhelming and include too much detail for a shared branch. So a force push allows you to rebase your commits and force push the changes to a remote branch.
However, using force commits on a shared remote branch can cause a lot of confusion if users find their history to be overwritten. This affects more than just lost commits. If other users have committed changes, those can be overridden with a force commit.
Instead, you can use the “–force-with-lease” option only to push those changes if the state of the remote branch matches what you have locally. The syntax will look something like this:
git push --force-with-lease origin mainThe above command is a safe way to invoke the “force” parameter without messing up other people’s work.
Conclusion
As you can see, using git to push your changes to a different remote branch is easy. As long as you have the requisite permissions, it’s just a one-liner, and the process is an integral part of the typical git collaboration workflow. It’s also used for hotfixes, which don’t require any collaboration, but as a quick way to push your changes to the production branch. As long as you ensure that you’re doing it responsibly, don’t force push something that overwrites other people’s changes, and follow best practices, it’s a valuable tool.


Domain Name Registration in Lagos: A Comprehensive Guide

Exploring Domain Registration and DNS Management with SirsteveHQ in Nigeria


